Tuesday 29 June 2021
Appium setup Android
All QA like to automate Mobile app, It has different challenges and multiple constrains , Lets crack 1st step and install Appium for android.... Anyone who want to learn mobile automation, below steps are helpful
Prerequisites
Minimum 8gb ram, 64bit windows, Admin access-if you are working under proxy
Software's
Java, Node, Eclipse, Selenium, Android Studio, Appium Server, Appium Jars
Steps to follow
1. Download Java and Set JAVA_HOME in Env Variable
2. Download Android Studio from below url,
https://developer.android.com/studio#downloads
for Windows 64 bits
3. Set ANDROID_HOME -SDK location
-Addressusers\AppData\local\Android\SDK
Above folder is hidden, you need to do it manually
4. Using Android Studio- configure Emulator
- C:\Program Files\Android\Android Studio\bin
-Open studio 64 and Configure Emulator from Tool tab- AVD
5. Download NODE , Set Node in Env variable
6. Download Appium server
7. Download Appium Jars
8. Install eclipse and add external jars of appium and selenium java
9. Start Appium server and run code with capabilities(include Device ID and APK path)
You need to have some .apk file and add the path in your code below and also Emulator name which you created at step 4
Code to launch APK
public class base {
public static AndroidDriver capabilities() throws MalformedURLException
{
AndroidDriver driver;
// TODO Auto-generated method stub
File appDir = new File("src");
File app = new File(appDir, "Test.apk");
DesiredCapabilities capabilities = new DesiredCapabilities();
capabilities.setCapability(MobileCapabilityType.DEVICE_NAME, "EmulatorName");
capabilities.setCapability(MobileCapabilityType.APP, app.getAbsolutePath());
driver = new AndroidDriver<>(new URL("http://127.0.0.1:4723/wd/hub"), capabilities);
}
I know its not easy to setup as mentioned, If google not help you, please reach out to me :)
#happylearning
#android #Appium #mobileautomation #selenium #automationtesting
Sunday 13 December 2020
JMETER- Rest Api Testing
1. For testing purpose get rest api of getPlace from below url,
https://openweathermap.org/current
For this get registered for this site to received session id as per your login
2. Then go to jmeter, create Thread group by right clicking on Test Plan .
3. Once Created Thread group, right click on Thread and create HTTP Request
 4. From step 1 , you will get rest api URL,
api.openweathermap.org/data/2.5/weather?q={city name}&appid={API key}
Divide this url in below format in jmeter,
Till org its server name, path is till weather and parameters we will add in parameters section, Appid is your app key (follow step 1)
4. From step 1 , you will get rest api URL,
api.openweathermap.org/data/2.5/weather?q={city name}&appid={API key}
Divide this url in below format in jmeter,
Till org its server name, path is till weather and parameters we will add in parameters section, Appid is your app key (follow step 1)
 5. Right click on Thread Group- Add- Config Element-User Defined Variable
 Use above value in step 4 screen shot as parameter
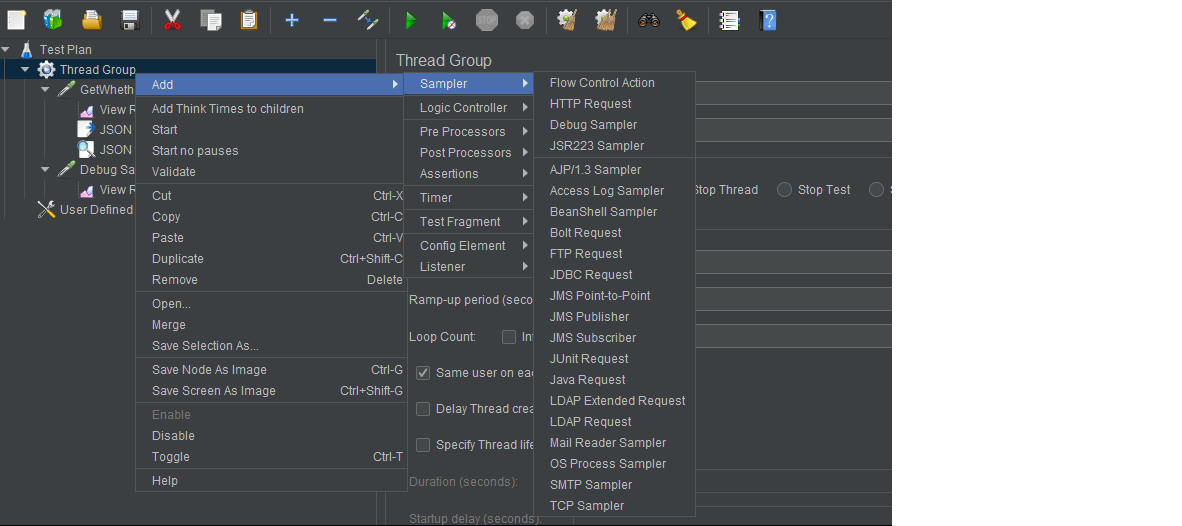
6. For verification, right Click on API name(get Weather) and add listener as View Result Tree
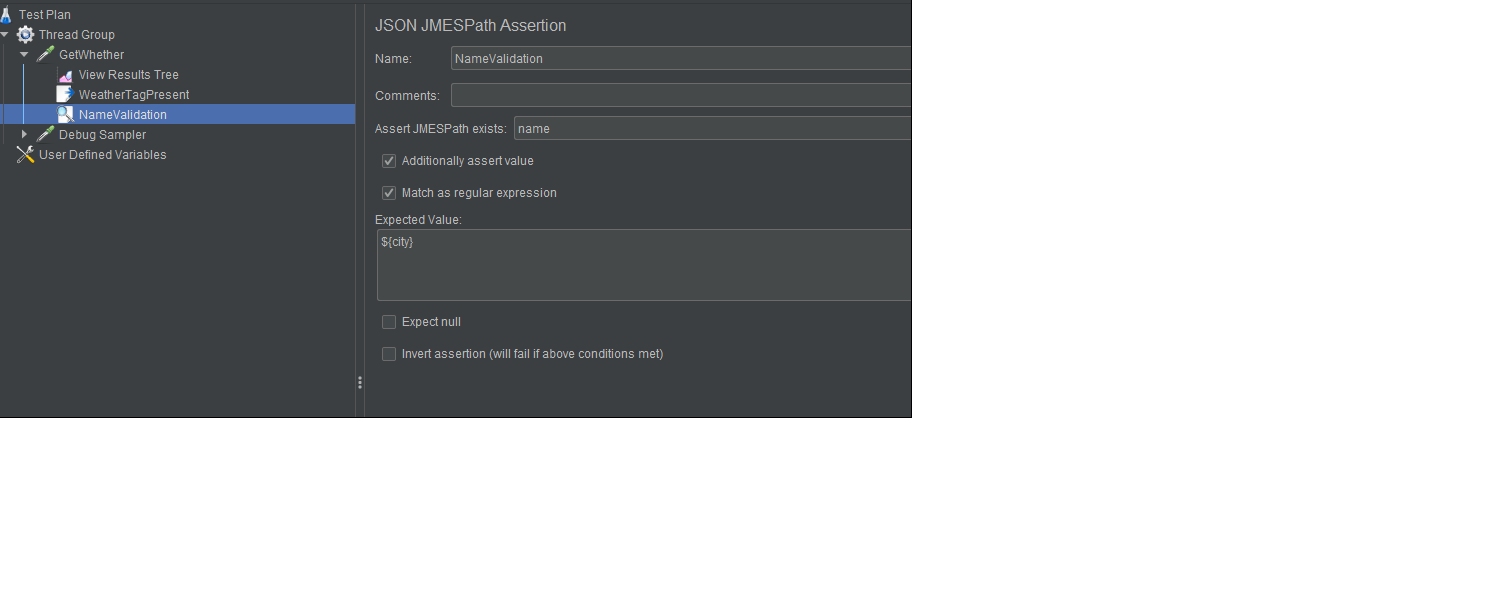
And add Assertion as json jmespath assertion, Expected value is User defined Variable
Use above value in step 4 screen shot as parameter
6. For verification, right Click on API name(get Weather) and add listener as View Result Tree
And add Assertion as json jmespath assertion, Expected value is User defined Variable
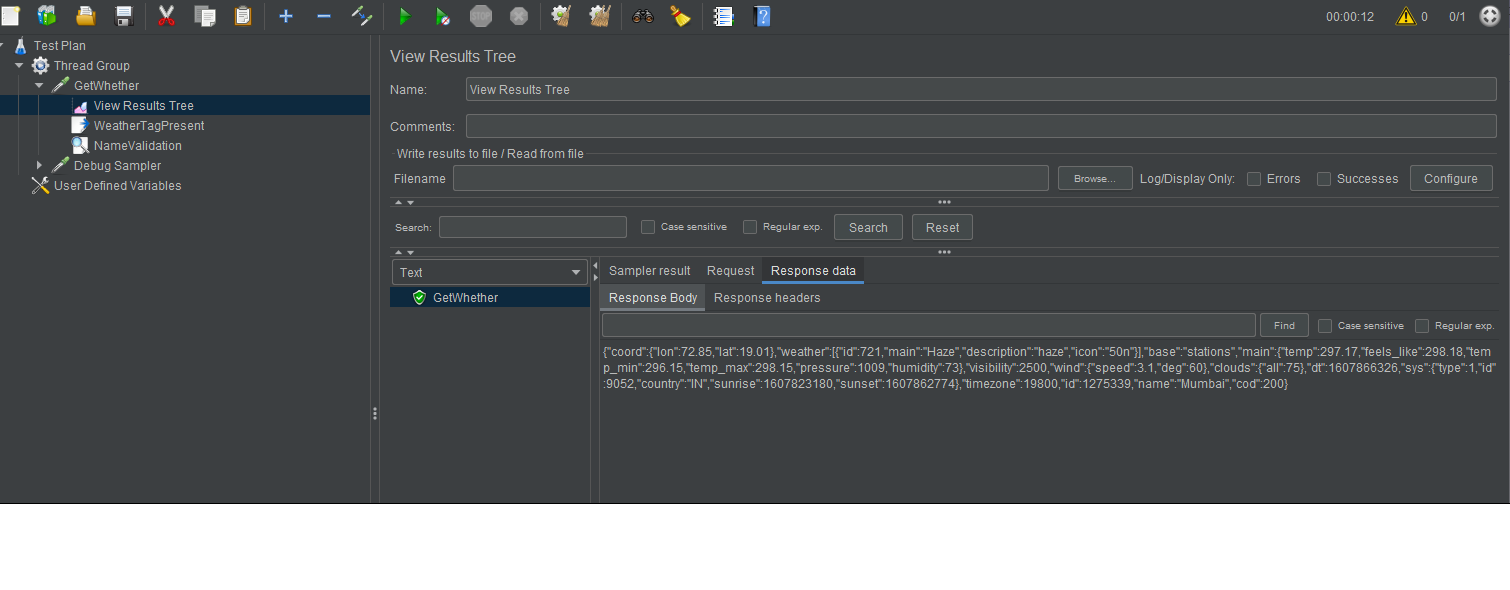
 7. Just click at top green icon and verify result by clicking on view result
 Happy Learning :)


Monday 4 May 2020
Webservice Maven Framework-BDD
Webservice Maven Framework
Pom.xml- io.cucumber, io.rest.assured,jackson,
reporting-maven cucumber reporting-damian
feature file-gherkin language
Step definition- Given- requestSpecification used (utility file)
-body from testData file-pojo concept
When- get resourceURL from API resources
Then-get response from json
Hooks- used to work before tags which mentioned in feature file
looging- used to read log
TestRunner- path of feature and step definition path, we may pick tag names to run specific tags
need to run thru maven command- mvn test verify to generate report
Friday 17 April 2020
Rest web service automation
Web service automation for REST api with java.
There are 4 types of methods.
Get- this dont need body
Post,Put,Delete- required body
For this you need to create java project and then add below mentioned jars in project.

Create basic java project, below is automation code syntax explanation
Given - Input(parameter, header, body)
When- Resource and HTTP method
Then -verification
All Input,resource, method has to come from developer before web service automation, its called contract.
suppose url is http://dummy.restapiexample.com/api/v1/employees, as per contract we can distribute as ,
base url-http://dummy.restapiexample.com/api/v1
resource-/employees
Below is code you need to use as request in eclipse,
import static io.restassured.RestAssured.given;
import static org.hamcrest.Matchers.equalTo;
import files.Payload;
import io.restassured.RestAssured;
import io.restassured.filter.session.SessionFilter;
import io.restassured.path.json.JsonPath;
public class Test {
public static void main(String[] args) {
// TODO Auto-generated method stub
RestAssured.baseURI="http://dummy.restapiexample.com/api/v1";
//given-input ,when-submit api-Resource and HTTP Method, then -validate response
//log()- for use to see details
System.out.println("----------GetDetails-----------------");
//in given method we use queryParam too , it include with "?" in url
//header is json most of times, for some time we have session ids in header, for that SessionFilter class is also avilable
//for post,put delete we need to add "body", for get body is not present
String response=given().header("Content-Type", "application/json")
.when().get("/employees")
.then().log().all().assertThat().statusCode(200)
.extract().response().asString();
System.out.println("response is :" + response);
JsonPath js =new JsonPath(response);
String emp= js.get("data[0].employee_name");
//in response data field is come up with array, so used array concept for 1st emp
System.out.println("1st emp is :"+ emp);
}
}
Below is response,

So above is GET method, so its without Body. In Given , we use queryParam too , it include with "?" in url which is not present in above example.
Path parameter- use to give specific data from response,Query Parameter- after path parameter, it drill down and give as per your required data, both present in given section
For attachment , we use multipart method in given section, which not used in above example.
relaxHTTPSValidation in given code is important for real world example.
header is json most of times, for some time we have session ids in header, for that SessionFilter class is also available, which is not needed in above example
Sunday 12 April 2020
TestNg installation
Open Eclipse
Click on help
Install new Software
Enter below url,
http://dl.bintray.com/testng-team/testng-eclipse-release/
Click on manage
Click on continue,
If you get any error click on continue
Click on help
Install new Software
Enter below url,
http://dl.bintray.com/testng-team/testng-eclipse-release/
Click on manage
Click on continue,
If you get any error click on continue
Wednesday 18 March 2020
protractor framework ..POM+Cucumber+Typescript
POM+Cucumber+Typescript
1. Package.json need below dependancies
"@types/cucumber": "^6.0.1",
"@types/jasmine": "^3.5.9",
"@types/jasminewd2": "^2.0.8",
"@types/node": "^13.9.0",
"chai": "^4.2.0",
"chai-as-promised": "^7.1.1",
"cucumber": "^6.0.5",
"cucumber-html-reporter": "^5.1.0",
"jasmine": "~3.5.0",
"protractor": "^5.4.3",
"protractor-cucumber-framework": "^6.2.1",
"ts-node": "7.0.1",
"typescript": "~3.8.2"
2. Need Step Definition and feature file folder
3. Conf.js contain path of step2..
Also it contain report creation format ie json
and "onComplete" input for report in html
4. Step Definition contain hook (same like testng in selenium)file..
Which use for failure screenshot
5. Page Object folder will contain page related objects which will use in step definition
6. All files will be written in TS and command "TSC" will convert them to JS and then "protractor conf.js" we have to execute
7. reports will be created using cucumber-html-reporter
8.hooks file connect with tags of feature file and you can add extra code with any tags(scenarios) of feature file using hook, use tag after, check failure and then screen shot code in hook, its behave same like listener
for running jenkins.war, use below command from file path thru cmd
java -jar jenkins.war -httpPort=3333
Below is Jenkins config
1. add ur project path in jenkin config
2. add command to run conf file
3. schedule ur script
Wednesday 12 February 2020
Protractor Cucumber setup
Protractor tool use for automation tool for angular JS. Cucumber is good framework for Agile methodology
Node should be installed in your machine
Open CMD at root folder where you will add all your code mentioned below in step 4,5
1.... npm install -g protractor
npm install -g cucumber
2.If you are in proxy run below command

Node should be installed in your machine
Open CMD at root folder where you will add all your code mentioned below in step 4,5
1.... npm install -g protractor
npm install -g cucumber
2.If you are in proxy run below command
node ./node_modules/protractor/bin/webdriver-manager --proxy url update--versions.standalone "version"--versions.chrome "version"--ignore_ssl
Otherwise use below command
webdriver- manager update
3.Now start webdriver server,if you are not in proxy use below command,
webdriver- manager start
4. use below conf.js
var chai = require("chai");
var chaiAsPromised = require("chai-as-promised");


exports.config = {
  // The address of a running selenium server.
 seleniumAddress: 'http://localhost:4444/wd/hub',
 //directConnect: true,
 frameworkPath: require.resolve
('protractor-cucumber-framework'),
framework: 'custom',
// setting time outs
getPageTimeOut : 200000,
allScriptsTimeout : 500000,
setDefaultTimeout: (60 * 1000),
// Capabilities to be passed to the webdriver instance.
capabilities: {
browserName: 'chrome',
//args : '--disable-extensions',
resultJsonOutputFile: 'report.json',
},
specs: [
'Feautures/app.feature'
],
cucumberOpts: {
require: 'Feautures/Step_Definition/my_step_definitions.js',
//format: ['json:reports/results.json', 'pretty'],
tags: false,
//format: ["node_modules/cucumber-pretty"],
profile: false,
'no-source': true,
strict: true,
'no-colors': true,
},
};
5. use below app.feature (path mentioned in step 5 code)
@regression
Feature: first test cases

Scenario: Home Screen validation
    Given As I launch room77 app
    Then I should see logo
 Then I should see button
6. use below step definition (path mentioned in step 5 code)
//features/step_definitions/my_step_definitions.js
//var {defineSupportCode} = require('cucumber');
var chai = require('chai');
var expect = chai.expect;
var chaiAsPromised = require('chai-as-promised');
var {setDefaultTimeout} = require('cucumber');


chai.use(chaiAsPromised);
var expect = chai.expect;

module.exports = function()
{
  this.Given(/^I go to "([^"]*)"$/, function(site, callback) {
//   browser.ignoreSynchronization = true;
console.log("text is1ww :")
    browser.get(site);
callback();
  });

  this.When(/^I click$/, function() {

   browser.ignoreSynchronization = true;
   console.log("text is1 :")
    element(by.xpath('//input[@class="gNO89b"]')).click();

  });


  this.Then(/^I should see button$/, function( callback) {
  browser.sleep(10000);
   browser.ignoreSynchronization = true;
  var el = element(by.xpath('//div/p/input[@class="btn"]'));
                    browser.manage().timeouts().implicitlyWait(2000);
                     el.isPresent().then(function (result) {
                         console.log("Button Exist:" + result);


                    });
     callback();
  });


 this.Given(/^As I launch room77 app$/, function (callback) {
        browser.get("https://www.room77.com");
       // return browser.waitForAngular();
    browser.ignoreSynchronization = true;
    callback();
    });


    this.Then(/^I should see logo$/, function (callback) {
  browser.sleep(10000);
  browser.ignoreSynchronization = true;
        var el = element(by.xpath('//img[@class="logo"]'));
                    browser.manage().timeouts().implicitlyWait(2000);
                     el.isPresent().then(function (result) {
                         console.log("Logo Exist:" + result);
                    });
     callback();
    });

};
7. Now run protractor with below command,
protractor conf.js
You will get below result,

Remember to run step 7, you need to run step 2 and 3 always...
Happy learning :)
git commands
Pull data- git stash, git pull
created branch in Git-https://github.build.ge.com/OperationalExcellence/OEAutomation/tree/RegressionFixes-OWWAdvisor
folder local- C:\Users\ylondhe\Documents\Dunnes\OEAutomationGit
1.create branch, move to main branch, pull from it, move to new branch, add change and then commit
git clone url- "getting code from branch, url from UI"
git checkout -b branchname -"new subbranch in branch"
git checkout branch name -"change branch"
git status -"check changes"
git add file name- "add file from local"
git commit -m "message" -"comiting code with message"
git push -"code push to branch"
steps to resolve the merge issue:
1. git checkout branchaName
2. git pull
3. git checkout <ur branch name>
4. git merge origin/branchname
there will be merge issue
which u need to resolve in local
5. git add
6. git commit
commit once all files are done
7. git commit
8. git push
Git creating SSH key
- Open Git
Bash.
- Paste
the text below, substituting in your GitHub email address.
$ ssh-keygen -t rsa -b 4096 -C "your_email@example.com"
This creates a new ssh key, using the provided email as a label.
> Generating public/private rsa key
pair.
- When
you're prompted to "Enter a file in which to save the key,"
press Enter. This accepts the default file location.
> Enter a file in which to save the
key (/c/Users/you/.ssh/id_rsa):[Press enter]
- At
the prompt, type a secure passphrase. For more information, see "Working
with SSH key passphrases".
5. >
Enter passphrase (empty for no passphrase): [Type a passphrase]
> Enter same passphrase again: [Type
passphrase again]
Before adding a new SSH key to the ssh-agent to manage your keys, you should
have checked for
existing SSH keys and generated a new SSH
key.
If you have GitHub Desktop installed,
you can use it to clone repositories and not deal with SSH keys. It also comes
with the Git Bash tool, which is the preferred way of running git commands on
Windows.
- Ensure
the ssh-agent is running:
- If
you are using the Git Shell that's installed with GitHub Desktop, the
ssh-agent should be running.
- If you are using another terminal prompt,
such as Git for Windows, you can use the "Auto-launching the
ssh-agent" instructions in "Working with
SSH key passphrases", or start it manually:
o #
start the ssh-agent in the background
o $
eval $(ssh-agent -s)
> Agent pid 59566
- Add
your SSH private key to the ssh-agent. If you created your key with a
different name, or if you are adding an existing key that has a different
name, replace id_rsa in the command with the name of your
private key file.
$ ssh-add ~/.ssh/id_rsa
After this just add'
clip < ~/.ssh/id_rsa.pub
n then automatic copy created in windows and just use paste in setting screen
clip < ~/.ssh/id_rsa.pub
n then automatic copy created in windows and just use paste in setting screen
Adding a new SSH key to your GitHub account
Copy the SSH key to your clipboard.
If your SSH key
file has a different name than the example code, modify the filename to match
your current setup. When copying your key, don't add any newlines or
whitespace.
$ clip < ~/.ssh/id_rsa.pub
# Copies the contents of the id_rsa.pub
file to your clipboard
Add this in settings of Git from UI.
Tuesday 29 October 2019
multiple window handler selenium
naukri.com has multiple screen, Set is use for managing all screens thru iterator. getWindowHandles() is selenium function
import org.openqa.selenium.WebDriver;
import org.openqa.selenium.chrome.ChromeDriver;
import java.util.Iterator;
import java.util.Set;
public class multipleWindows {
public static void main(String[] args) {a
// TODO Auto-generated method stub
WebDriver driver;a
System.setProperty("webdriver.chrome.driver", "C://Users//ylondhe//Documents//chromedriver.exe");
driver= new ChromeDriver();
driver.manage().window().maximize();
driver.get("http://www.naukri.com/");
String mainWindow=driver.getWindowHandle();
System.out.println("mainWebApp :" + mainWindow);
// It returns no. of windows opened by WebDriver and will return Set of Strings
Set<String> set =driver.getWindowHandles();
// Using Iterator to iterate with in windows
Iterator<String> itr= set.iterator();
System.out.println("OPen windowes count :" +set.size());
System.out.println("OPen windowes :" + set);
while(itr.hasNext()){
String childWindow=itr.next();
// Compare whether the main windows is not equal to child window. If not equal, we will close.
if(!mainWindow.equals(childWindow)){
driver.switchTo().window(childWindow);
System.out.println(driver.switchTo().window(childWindow).getTitle());
}
}
driver.close();
driver.quit();
}
}
Monday 26 March 2018
Saturday 19 August 2017
Protrator Set up with Eclipse as editor
Installing Protractor
To set up protractor, we need to install below three
things :
1. Node.js
2. Protractor
3. Selenium Webdriver
Step 1: Node.js Setup
- First we have to
install NodeJS.
(https://nodejs.org/en/download/)
- Click on Windows
Installer
- Once the download has finished , proceed to installation
by click on downloaded exe file .
- Now to see if the installation is done successfully, you
can go and check in variables. The path
will be defined automatically. To open
system environment : Click on Start >
select Control Panel >double click System > select the Advanced tab Or
You can also check from the command prompt by typing the
command 'npm -version ' and press Enter
in command prompt
Step 2: Protractor
Setup
- To install protractor globally we need to use “npm install
–g protractor” in cmd
-To check version of protractor we have to use –
“protractor--version”
Step 3: Webdriver
Setup
- To install Webdriver , we need to use “npm install -g
webdriver-manager” in cmd
- To setting up selenium server , we need to use
“webdriver-manager update” in cmd
-Before running any protractor script we need to turn on
selenium server with command
“webdriver- manager start”
Use below code as test.spec
describe('angularjs homepage todo list', function() {
it('should add a
todo', function() {
browser.get('https://angularjs.org');
element(by.model('todoList.todoText')).sendKeys('write first protractor
test');
element(by.css('[value="add"]')).click();
var todoList =
element.all(by.repeater('todo in todoList.todos'));
expect(todoList.count()).toEqual(3);
expect(todoList.get(2).getText()).toEqual('write
first protractor test');
// You wrote your
first test, cross it off the list
todoList.get(2).element(by.css('input')).click();
var
completedAmount = element.all(by.css('.done-true'));
expect(completedAmount.count()).toEqual(2);
});
});
and below code as conf.js
exports.config = {
seleniumAddress:
'http://localhost:4444/wd/hub',
specs:
['todo-spec.js']
};
Try both code keep in npm folder if network securities are
more in your office
run the code using CMD by reaching in folder
"protractor conf.js"
Now with integrated with Eclipse try below steps
Yes, you can use protractor plugin in eclipse.
1. Go to
help-->Marketplace
2. Search for
tern.java
3. Install Tern
Eclipse IDE
4. and accept the
licence.
Now create a project in eclipse
5. Right click on
project-JS project,
6. Add node_module
from c folder to eclipse, add above 2 files in project
Installing Protractor
To set up protractor, we need to install below three
things :
1. Node.js
2. Protractor
3. Selenium Webdriver
Step 1: Node.js Setup
- First we have to
install NodeJS.
(https://nodejs.org/en/download/)
- Click on Windows
Installer
- Once the download has finished , proceed to installation
by click on downloaded exe file .
- Now to see if the installation is done successfully, you
can go and check in variables. The path
will be defined automatically. To open
system environment : Click on Start >
select Control Panel >double click System > select the Advanced tab Or
You can also check from the command prompt by typing the
command 'npm -version ' and press Enter
in command prompt
Step 2: Protractor
Setup
- To install protractor globally we need to use “npm install
–g protractor” in cmd
-To check version of protractor we have to use –
“protractor--version”
Step 3: Webdriver
Setup
- To install Webdriver , we need to use “npm install -g
webdriver-manager” in cmd
- To setting up selenium server , we need to use
“webdriver-manager update” in cmd
-Before running any protractor script we need to turn on
selenium server with command
“webdriver- manager start”
Use below code as test.spec
describe('angularjs homepage todo list', function() {
it('should add a
todo', function() {
browser.get('https://angularjs.org');
element(by.model('todoList.todoText')).sendKeys('write first protractor
test');
element(by.css('[value="add"]')).click();
var todoList =
element.all(by.repeater('todo in todoList.todos'));
expect(todoList.count()).toEqual(3);
expect(todoList.get(2).getText()).toEqual('write
first protractor test');
// You wrote your
first test, cross it off the list
todoList.get(2).element(by.css('input')).click();
var
completedAmount = element.all(by.css('.done-true'));
expect(completedAmount.count()).toEqual(2);
});
});
and below code as conf.js
exports.config = {
seleniumAddress:
'http://localhost:4444/wd/hub',
specs:
['todo-spec.js']
};
Try both code keep in npm folder if network securities are
more in your office
run the code using CMD by reaching in folder
protractor conf.js
Now with integrated with Eclipse try below steps
Yes, you can use protractor plugin in eclipse.
1. Go to
help-->Marketplace
2. Search for
tern.java
3. Install Tern
Eclipse IDE
4. and accept the
licence.
Now create a project in eclipse
5. Right click on
project-JS project,
6. Add node_module
from c folder to eclipse, add above 2 files in project

7. Mouse hover to configure and
Click on convert
to tern project
8. Right click and click Run as configure add
main tab as conf.js and project name in directory
and protractor
tab as cli.js(go till node module),click on Done, select protractor and save
9. RUn the script
using eclipse
Subscribe to:
Posts (Atom)